How to Pair ITS or ITC Sensors to AirTouch

It is an easy process to pair your ITC Sensors to AirTouch for greater temperature control and energy efficiency with your air conditioning.

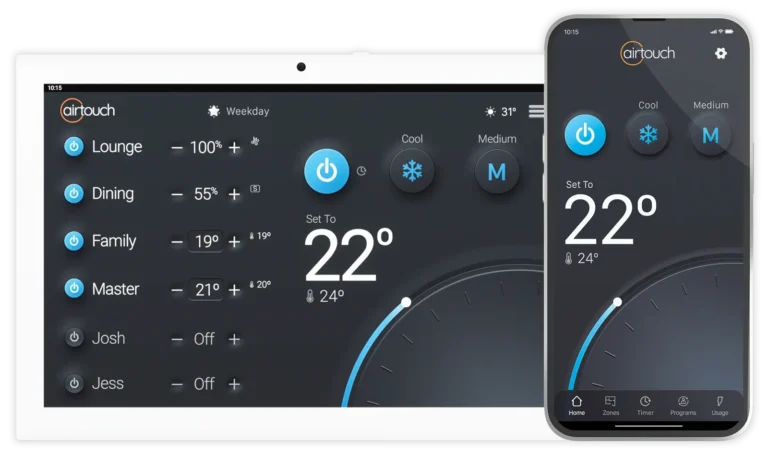
AirTouch’s ITS/ITC Sensors are wireless and don’t need any extra cabling making it possible to add them onto AirTouch very quickly and in batches at once. See how easy it is easy to assign them to a zone and then pair them to your console. They are powered by a 3V CR2450 battery. Intelligent Temperature Sensor Technology or Individual Temperature Control with our ITS/ITC Sensors can offer greater control of your home climate with more precise temperature control and energy savings with your home air conditioning.

Additional temperature sensors help solve the problem of hot and cold spots in your home, and helps with energy savings because they give AirTouch real time feedback about temperatures in each zone, so AirTouch wont waste energy cooling or heating zones that are already at your chosen set point (comfort level).

Assign a Sensor to a Zone

To assign a wireless temperature sensor to a zone:

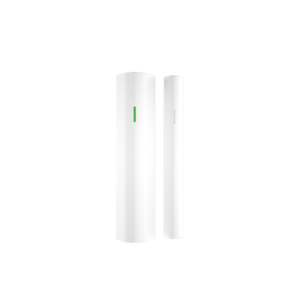
Start by removing the plastic cover from the sensor.

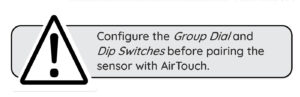
Rotate the Zone Dial to assign it to a Zone by selecting the correct zone number to correspond with the zone that you are placing the sensor in. These are in same order they are displayed on your AirTouch Home Screen. Eg, Dial Number 1 = Zone 1 (the first Zone); Dial Number 2 = Zone 2 (the second Zone) and so on. You may need a small screwdriver to help with this.

Zone Selector Dial

Zone Numbers

DialZone
Dial Number 1Zone Number 1
22
33
44
55
66
77
88
99
A10
B11
C12
D13
E14
F15
016

Pairing your ITS/ITC Sensor to AirTouch

Remove the plastic cover from the sensor.

On the AirTouch console open the Quick Menu and select System Settings > Sensors and turn Sensor Pairing from Stop to Start.

Push and hold the Pairing Button (2) for 5 seconds until the LED on the sensor turns blue (Zone On) or red (Zone Off).

The zone name will appear on the sensor page of AirTouch when the pairing is successful. Repeat this process for all sensors in the same installation.

Select Stop on the Sensors Page after pairing all sensors. The Home Screen will show both set points and temperature control for the groups which have sensors successfully assigned.

Replacing the Sensor Battery

The battery (3) used in the ITS/ITC is 3V CR2450. When the battery is low, a Low Battery icon will appear near the group name of the sensor. A good battery should last for around 1 ½ to 2 years. When the battery is flat, the group will change to % control if there is no other sensor in it. The low battery sign will disappear from the zone. The zone will then be treated as a zone without a sensor. When replacing the battery, it is a good idea to press and hold the Pairing Button (2) after removing the dead battery for 5 seconds to remove any residual charge from the circuit.

4 Responses

  1. Yesterday, all my ITC’s(5) stopped communicating with the Air Touch 4 HMI. They only show % air flow and do not have an oval band around the % indicating the signal has been lost. There were no LED error codes. Replaced the battery in one sensor as a test, no change.

    Any help would be great.

    Kind regards Jon.

    1. Hi Jon, if a temperature sensor drops off a Zone, you may just need to re pair it with AirTouch in the settings menu after replacing the batteries. Or, you may need to change between % mode or degrees mode by tapping the % or or temperature next to the zone name.

    2. Hi, this has happened to us also, however they won’t re-pair with the console. Any other ideas on getting them to work again?

      1. Hi Marian, make sure the temperature sensors have a full/fresh battery and that the zone selector dial is in the correct position. Then through the Quick Menu, and System Settings, enter ‘Sensor Pairing’. Press the button to activate sensor pairing mode, then push the button on your sensor for up to 5 seconds until the light turns blue. This should make the sensors pair again, and you’ll see them listed on the screen. Remember you may need to turn a zone back to sensor mode by tapping the air flow % on the home screen. If you need further help please either give us a call or fill in our support form, and a support technical will reach out to you to help.

Leave a Reply

Your email address will not be published. Required fields are marked *

All fields marked with * must be filled.
Please enter a valid email.

As the wave of technological innovation surges forward the concept of smart homes has transitioned from a futuristic idea to a practical reality Home automation systems in Australia are becoming increasingly popular making daily tasks more convenient with the use of voice control technologies with smart assistants like Google Assistant...

A South Australian AirTouch user sent us their 8216 5 star 8217 review on how they 8217 ve been enjoying their AirTouch We thank them fro letting us share it here for everyone to read up on From Elouise M an AirTouch 2 Plus user in Metropolitan Adelaide What an...

The answer is a resounding yes for most users Also if you are building a new house your AirTouch can be added to your new ducted or VRF air conditioner when it is being installed as well as retrofitted later on AirTouch is designed to integrate seamlessly with a wide...

Nestled on a hilltop in Wongawallan Queensland Viewmoore stands as a monumental testament to the seamless marriage of architectural excellence and smart home innovation This luxurious estate sprawling over 11 private acres is not just a dwelling but a statement of sophisticated living offering breathtaking views of the Gold Coast...