


(657239) Commissioning Notes
- Initialise the AC Unit with Fujitsu AC wall controller connected to set the required field settings. Then disconnect the AC wall controller if it’s not to be used.
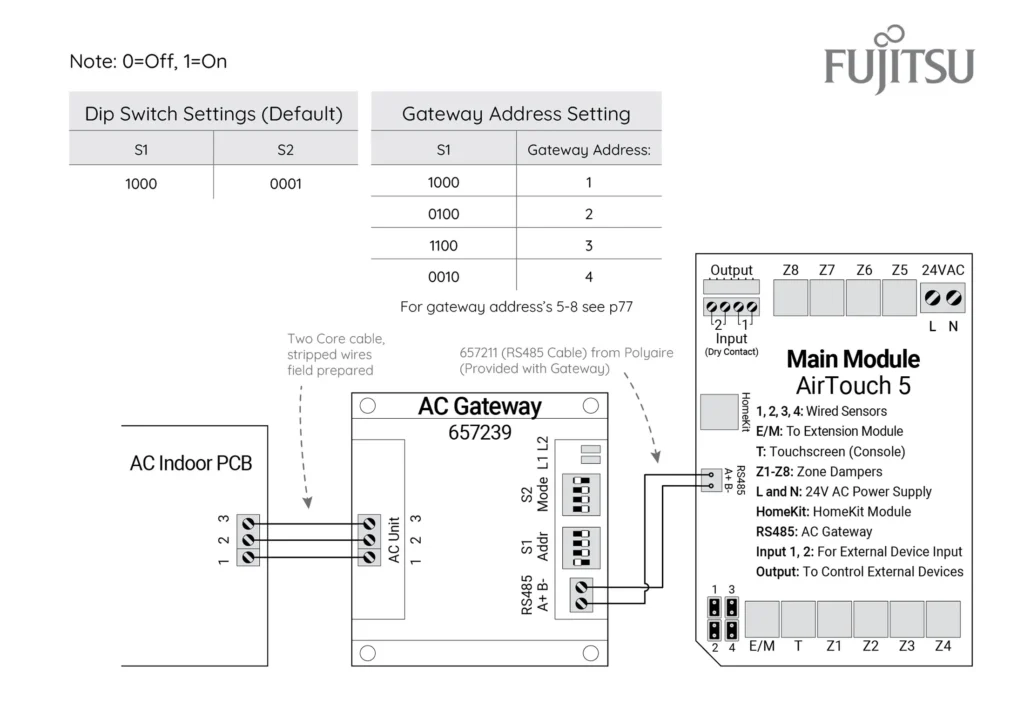
- Wire AirTouch, Gateway and AC indoor as per diagram and leave the dipswitches on the gateway at their default position. Make sure all wires are connected properly. If multiple gateways are installed and gateway address is not 1, follow the Gateway Address Setting table to set dipswitch S1.
- In the case the gateway is master and Fujitsu wall controller is connected as slave (sub) or not connected: If AirTouch sensors are used for AC temperature control:
- Settings on the AC wall controller: Have the Fujitsu wall controller connected as Master and set thermostat sensor to the remote controller (Go to Service->Function Setting, find Function No 42, and set its value to 01. Then go to Submenu and change “R. C. sensor control” from Off to On). Then set the wall controller back to Slave (sub) or remove it if it’s not to be used.
- Settings on the Gateway: Set position 4 of S2 to On (1) (Default).
- Settings on the AirTouch console: Go to Settings>Installer>AC Setup and select the proper temperature sensor for AC Control.
- Restart the AC and gateway first and then power up AirTouch or power them up at the same time.
- If AirTouch sensors are not used and the Fujitsu wall controller is not connected, the AC control sensor has to be set to AC return air sensor. The AirTouch console will show AirTouch sensors’ temperature as Home Temp or Control Sensor value.
In the case the gateway is connected as Slave and Fujitsu wall controller is connected as Master. If AirTouch sensors are used for AC temperature control:
- Settings on the AC Controller: Set thermostat sensor to the remote controller (Go to Service->Function Setting, find Function No 42, and set its value to 01. Then go to Submenu and change “R. C. sensor control” from Off to On).
- Settings on the Gateway: Set position 4 of S2 to Off (0)
- Settings on the AirTouch console: Go to Settings>Installer>AC Setup and select the proper temperature sensor for AC control.
- Restart the AC and gateway first and then power up AirTouch or power them up at the same time.
If AirTouch sensors are not used for AC temperature control and the AC is set to use its return air sensor as control sensor, the AirTouch console will show AirTouch sensors’ temperature as Home Temp or Control Sensor value.
Important Notes
For the following units, Install with the Fujitsu wall controller as master and all six switches on the wall controller set to OFF.
- ART45LUAK
- ART54LUAK
- ART90TUAJ
- ART45UUAK
- ART30UUAN
The following units require new Fujitsu indoor PCB version:
- ARTC72LATU
- ARTC90LATU
For the following units, install with the Fujitsu wall controller as master and all six switches on the wall controller set to OFF).
- ART36RUAK
- ART45RUAK
- ART60RUAK
- ARTC36LATU
- ARTC54LATU
- ARTC60LATU
For the following units:
- ARTH**KHTA
- ARTH**KHTB
- ARTH**KMTAP
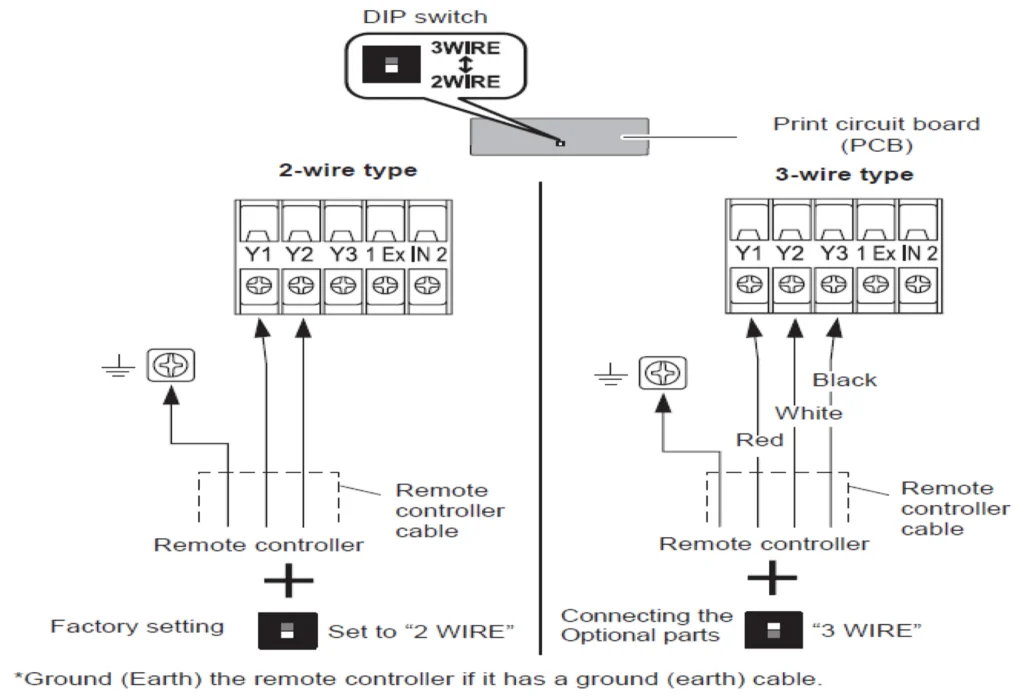
These models are configured for a two-wire control by default, and are required to be configured to a three-wire control to fit the AirTouch Fujitsu 657239 three-wire gateway.
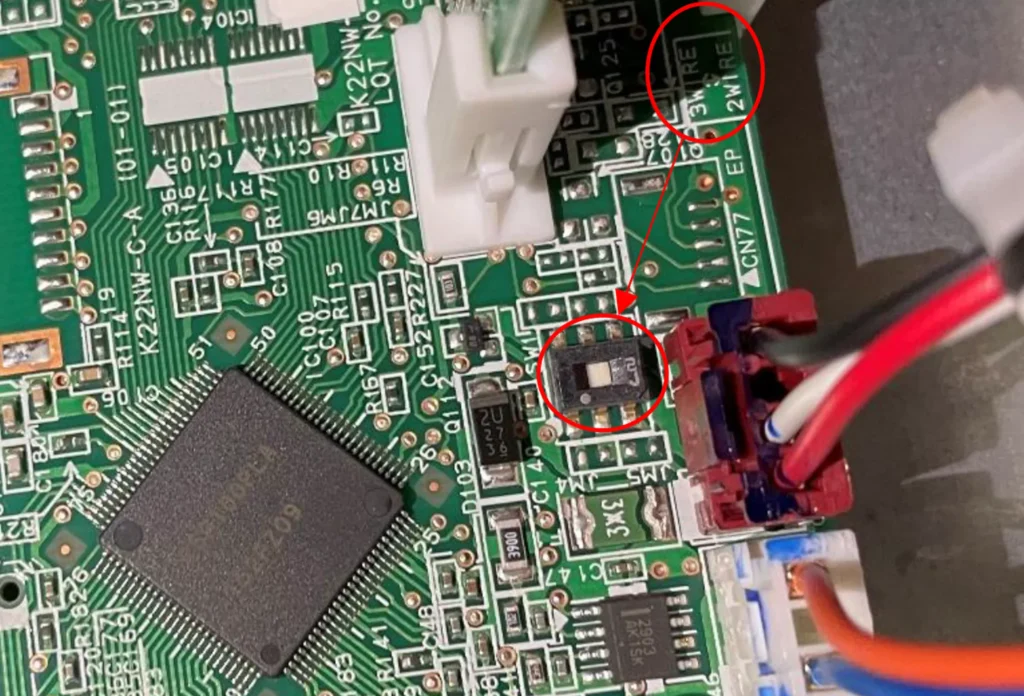
- Change the switch from factory setting 2-wire to 3-wire side on the indoor PCB as shown in images below.
- Connect 657239 Fujitsu Gateway to the terminals Y1 (1), Y2(2), and Y3 (3).
See below diagrammatic instructions to configure Fujitsu AC from two-wire to three-wire.